Welding is a skill that has shaped the world we live in. From skyscrapers and bridges to cars and art, welding brings metal together to create strong, lasting connections. If you have ever been curious about how to weld, you’re not alone.
Many people see the bright sparks and hear the buzz of welding and want to try it themselves. But welding can feel intimidating for beginners. There is special equipment, safety issues, and many methods to choose from.
Learning how to weld is possible for anyone with patience, attention to detail, and a willingness to practice. This guide will walk you through everything you need to know. You’ll learn about the different welding processes, what equipment you need, how to set up safely, and the step-by-step techniques for beginners.
We’ll also cover materials, troubleshooting, and tips that experienced welders wish they knew when starting out. Whether you want to repair a broken tool, build a metal project, or start a new career, this article will help you understand welding from the ground up.
What Is Welding?
Welding is a process that joins two pieces of metal by melting them and adding a filler material to form a strong bond. The melted metals cool and harden, creating a joint as strong as the original pieces. Unlike gluing or bolting, welding changes the metals at a molecular level.
There are many types of welding, but most use an electric arc, a flame, or pressure to heat the metals. The most common metals welded are steel, stainless steel, and aluminum. Each has its own challenges and uses.
Welding is used in almost every industry that works with metal. It’s found in construction, manufacturing, automotive repair, shipbuilding, and even in art. The process can be simple or complex, depending on the job.
Welding doesn’t only create physical bonds—it can also repair, modify, and reinforce metal parts. For example, a broken bicycle frame or a cracked lawnmower handle can often be fixed with a simple weld. On the other hand, delicate tasks such as making jewelry or scientific equipment use precise welding to join small pieces without damaging them.
A unique aspect of welding is that it often happens in places you can’t see, like inside bridges or high up on buildings. Welders often work in tight spaces, under cars, or even underwater. In fact, some specialized welders are trained to repair ships below the waterline.
Welding also plays a big role in art and design. Many artists use welding to create sculptures, metal furniture, and decorative gates. In these cases, welding is not just about strength but also about appearance. A well-made weld can be part of the final look.
Understanding what welding can do gives you more control over repairs and creative projects. As you learn, you’ll see metal in a new way—knowing that almost anything metal can be shaped, joined, or built with the right welding process.
Main Types Of Welding Processes
Choosing the right welding method is important. Each process has its pros and cons, and some are easier for beginners. Here are the main types of welding you should know:
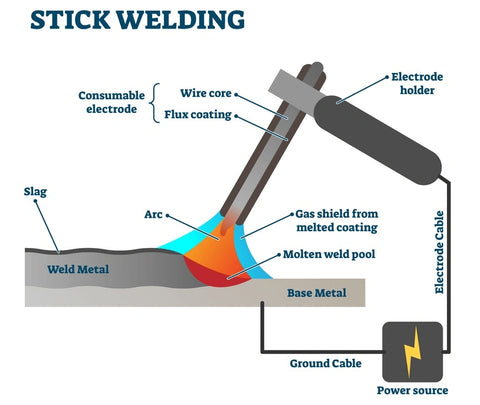
1. Shielded Metal Arc Welding (smaw Or Stick Welding)
SMAW, or stick welding, is one of the oldest and simplest welding methods. It uses a metal rod (the stick) covered with a flux coating. An electric current passes through the rod, creating an arc that melts both the rod and the workpiece.
- Pros: Inexpensive equipment, works outside, good for thick metals.
- Cons: More spatter, not as clean as other methods, slower.
Stick welding is a favorite for farm repairs, outdoor construction, and heavy equipment maintenance. One big advantage is that it works well on dirty, rusty, or painted metal—conditions where other methods might fail. However, it produces more smoke and requires cleaning up the slag that forms after each weld.
Stick welding rods come in different types for different metals, so always choose the right one for your project.
2. Metal Inert Gas (mig) Welding
MIG welding, also called Gas Metal Arc Welding (GMAW), uses a spool of wire fed through a gun. It melts the wire and the workpiece with an electric arc, while a shielding gas protects the weld from air.
- Pros: Easy to learn, fast, clean welds, good for thin and thick metals.
- Cons: Equipment is more expensive, not ideal for outdoor use due to wind blowing away the gas.
MIG welding is popular in auto repair shops, small fabrication businesses, and home workshops. Because it’s semi-automatic, you can focus on moving the gun along the joint rather than worrying about feeding the wire yourself. The shielding gas (often a mix of argon and CO₂) is important for a clean weld but can be blown away by wind, so MIG is best for indoor use or calm weather outside.
3. Tungsten Inert Gas (tig) Welding
TIG welding, or Gas Tungsten Arc Welding (GTAW), uses a non-consumable tungsten electrode and a separate filler rod. A shielding gas protects the weld.
- Pros: Very precise, clean, can weld thin metals and non-ferrous metals like aluminum.
- Cons: Slower, requires more skill, equipment can be costly.
TIG welding is often used for aerospace parts, food equipment, and art because the welds are very clean and strong. The process gives you control over the weld, but you need to use both hands—one for the torch, one for the filler rod.
TIG is also the go-to method for welding thin materials or metals like titanium and magnesium. It can be challenging for beginners, but learning TIG opens up new possibilities.
4. Flux-cored Arc Welding (fcaw)
Flux-cored welding is similar to MIG welding, but the wire has a flux core. This allows some types to be used without a shielding gas.
- Pros: Good for outdoor work, fast, works on dirty or rusty metals.
- Cons: More spatter, welds may need cleaning.
There are two main types: self-shielded and gas-shielded flux-cored wire. Self-shielded can be used outdoors, even in windy conditions, because the flux inside the wire creates a protective gas. This method is great for construction sites, fences, and heavy repairs. However, it produces more spatter and usually requires grinding or brushing afterward.
5. Other Welding Processes
Some advanced or specialized methods include:
- Oxy-acetylene Welding: Uses a gas flame, often for thin metals or cutting.
- Plasma Arc Welding: Used in industry for very precise work.
- Spot Welding: Used in car manufacturing for joining thin sheet metal.
For beginners, MIG welding and stick welding are the most common starting points.
Understanding the differences between welding processes will help you choose the right one for your needs. For example, if you want to build a garden gate at home, MIG is ideal. If you need to repair a tractor outside, stick or flux-cored welding is better.
If you plan to work with thin aluminum, TIG might be your best option.
One thing many beginners miss: you can often rent welding machines from tool rental shops. This lets you try different methods without a big investment.
Essential Welding Equipment And Tools
You need the right equipment to weld safely and effectively. Here’s what you’ll need to get started:
Welding Machine
The most important tool is the welding machine. This provides the power for the arc. Machines are rated by their maximum amperage and the type of current (AC or DC).
- MIG Welders: Great for beginners, very versatile.
- Stick Welders: Simple and affordable.
- TIG Welders: Precise, but more costly.
Many entry-level welders are “multi-process,” meaning they can handle MIG, stick, and TIG (with extra accessories). For home use, a 140–180 amp machine is usually enough to weld up to 1/4 inch steel. If you plan to weld thicker materials, look for machines with higher amperage.
Welding Helmet
A welding helmet protects your eyes and face from sparks, heat, and bright light (arc flash). Auto-darkening helmets are easier to use and adjust.
Auto-darkening helmets change shade automatically when you start welding, making them much more convenient than fixed-shade helmets. Some allow you to adjust sensitivity and darkness, which helps when working with different processes.
Protective Clothing
Welding creates hot sparks and UV light. Wear leather gloves, a long-sleeve shirt, pants, and boots. Never wear synthetic fabrics, which can melt.
A leather welding jacket offers the best protection, but heavy cotton shirts and jeans work for small jobs. Make sure pants cover the tops of your boots—never tuck them in, or sparks can fall inside.
Welding Gloves
Thick, heat-resistant gloves are a must. MIG gloves are thinner for dexterity, while stick welding gloves are thicker.
For TIG welding, special thin gloves offer better feeling and control, but less heat protection. Always choose gloves for your process.
Safety Glasses
Always wear safety glasses under your helmet to protect against flying debris.
Grinding, wire brushing, or chipping slag can send metal bits flying. Safety glasses are an extra layer of protection, even if you’re wearing a helmet.
Clamps And Magnets
Clamps hold your work in place, and magnets help position metal at angles.
You’ll need several clamps, especially for large or heavy pieces. Welding magnets can hold parts at 45°, 90°, or 135° angles, making setups much faster.
Wire Brush And Chipping Hammer
A wire brush cleans the weld area, and a chipping hammer removes slag after stick or flux-cored welding.
Look for a brush with steel bristles. After stick welding, use the chipping hammer to knock off the slag, then brush it clean.
Angle Grinder
An angle grinder is used for cleaning, smoothing, and cutting metal.
Buy grinding discs (for smoothing welds), cutoff wheels (for slicing metal), and flap discs (for blending edges). An angle grinder can also remove old paint or rust.
Measuring Tools
Accurate cuts and welds need tape measures, squares, and soapstone markers for marking metal.
Soapstone is a chalk-like stone that marks metal clearly but wipes off easily. Combination squares help measure and mark straight or angled cuts.
Welding Table
A sturdy, flat welding table makes your work easier and safer. Steel tops are best, as they can handle heat.
A steel table also lets you attach the ground clamp anywhere and makes cleaning up spatter simple. If you don’t have a welding table, use a thick steel plate on sawhorses, but avoid wood surfaces.
Gas Cylinder And Regulator
For MIG and TIG welding, you’ll need a gas cylinder (usually argon or CO₂) and a regulator to control flow.
A “C25” mix (75% argon/25% CO₂) is standard for MIG steel welding. Always store cylinders upright and secure, and check for leaks before use.
Consumables
Stock up on welding wire, electrodes, and filler rods for your chosen process.
Different projects need different wire thicknesses or types. Always match your consumables to the metal and welding process.
Comparison: Welding Methods For Beginners
To help you choose, see how the main methods compare:
| Welding Type | Difficulty | Cost | Best For | Shielding |
|---|---|---|---|---|
| MIG | Easy | Medium | Thin & thick metal, clean work | Gas |
| Stick | Medium | Low | Thick, outdoor work | Flux |
| TIG | Hard | High | Thin, precise work | Gas |
| Flux-Cored | Medium | Medium | Outdoor, dirty metal | Flux |
Two extra tips: Many welders buy cheap gloves, but they tear quickly—invest in a quality pair. Also, extension cords can cause voltage drop and weak welds; use thick cords (12-gauge or heavier) and keep them as short as possible.
Safety In Welding
Welding can be dangerous if you skip safety steps. Here’s how to protect yourself and others:
Personal Protective Equipment (ppe)
- Welding Helmet: Auto-darkening is best.
- Gloves: Leather, heat-resistant.
- Clothing: Cover all skin with cotton or leather.
- Boots: Steel-toe, high-top boots protect your feet.
- Respirator: Use in poor ventilation or for special metals.
A fire-resistant jacket is helpful for frequent welding. Earplugs are also smart—grinding and hammering can be very loud. If you wear glasses, get a helmet that fits over them.
Work Area Safety
- Ventilation: Welding fumes are dangerous. Work outside or use exhaust fans.
- Fire Prevention: Remove all flammable items within 10 meters. Keep a fire extinguisher nearby.
- Clear Workspace: Keep tools organized and cords untangled.
- First Aid Kit: Have one ready for burns or eye injuries.
Keep your work area dry, especially the floor. Water and electricity are a bad mix. Welding near open windows helps, but wind can also blow shielding gas away—block strong drafts if possible.
Electrical Safety
- Keep all equipment dry.
- Inspect cables and plugs before use.
- Turn off and unplug machines before maintenance.
Never weld in the rain or while standing in water. If your gloves get wet, change them immediately.
Eye Protection
Never look at the welding arc without protection. “Arc eye” is a painful burn to your eyes.
Even a quick glance at the arc can cause eye pain hours later. Arc eye feels like sand in your eyes and can take days to heal. Always warn people nearby to use protection or set up welding screens.
Many beginners miss two important points:
- Weld Fumes: Metals like galvanized steel release toxic fumes. Always check material safety data and use proper ventilation.
- UV Exposure: Even brief exposure can cause severe sunburn. Always cover your skin fully.
A third hidden danger: Hot metal looks the same as cold metal. Always tap or sprinkle water to test before touching.
Understanding Metals And Their Properties
Not all metals weld the same way. The type of metal affects your settings, filler material, and process.
Common Metals For Beginners
- Mild Steel: Easiest to weld, used for most projects.
- Stainless Steel: Needs more skill; used for food-grade or corrosion-resistant parts.
- Aluminum: Light but tricky; needs special techniques and equipment.
Copper, brass, titanium, and cast iron are also weldable, but each has unique needs. Most home projects use mild steel, which is strong, cheap, and widely available.
Metal Thickness
- Thin Metals (<2mm):Easy to burn through; use lower power.
- Medium Thickness (2–6mm): Common for frames, tables, and repairs.
- Thick Metals (>6mm): Need more heat and multiple weld passes.
When welding thin sheet metal (like car body panels), use quick, short welds to avoid warping. For thick steel (like trailer frames), move slower and make several passes if needed.
Magnetism
Some metals (like stainless steel) may not be magnetic. This affects how you clamp and position parts.
A strong magnet holds mild steel in place, but not aluminum or many types of stainless steel. Use non-magnetic clamps for these metals.
Metal Cleanliness
Clean metal welds better. Oil, paint, or rust can cause weak welds and toxic fumes.
Even a small amount of rust or grease can ruin a weld. If you see bubbling, holes, or black spots in your weld, stop and clean the area again.
Identifying Metals
If you’re not sure what metal you have, try these methods:
- Spark Test: Grind a small area and observe the spark pattern.
- Magnet Test: Mild steel is magnetic; aluminum is not.
- Color and Weight: Aluminum is lighter and silver; steel is heavier and gray.
If you’re unsure, ask at a metal supply shop or search for identifying marks or numbers on the piece.
Setting Up Your Welding Area
A safe and organized workspace makes welding easier and less stressful.
Location
- Use a well-ventilated area (garage with doors open, or outside).
- Have a sturdy steel table for work.
- Ensure enough space to move around safely.
Avoid welding in living spaces—fumes and sparks can damage furniture and electronics. If you work in a shared space, use welding curtains to protect others.
Power Supply
- Most welders use 110V or 220V. Check your power source.
- Use a dedicated circuit to avoid tripping breakers.
If your welder trips the breaker, unplug other tools or lights on the same circuit. For 220V welders, you may need a special outlet installed by an electrician.
Organizing Tools
- Keep your welding machine close but not blocking your movement.
- Arrange clamps, brushes, and grinders within reach.
- Store gas cylinders upright and secure them to prevent tipping.
Put small tools in a metal toolbox—plastic can melt from sparks. Hang cables and clamps on hooks to avoid tangling.
Fire Safety
- Remove all flammable liquids and materials.
- Place a fire extinguisher nearby.
- Keep a bucket of sand for small fires.
Inspect your area after welding for hidden smoldering sparks, especially in corners or under the table.
Lighting
- Good lighting helps you see your weld and avoid mistakes.
- Avoid strong backlight, which can hide defects.
Use a bright LED work light above your table. Natural daylight is ideal, but always supplement with artificial light if needed.
Preparing To Weld: Cleaning And Fit-up
A good weld starts with good preparation. Skipping this step is a common beginner mistake.
Cleaning Metal
- Use an angle grinder or wire brush to remove rust, paint, and oil.
- Clean at least 1 inch (2.5 cm) from the area to be welded.
- Wipe with acetone for oily metals (never use gasoline).
For aluminum, use a stainless steel wire brush (never steel), and clean just before welding—aluminum oxidizes quickly. For stainless steel, use a brush only for stainless to avoid contamination.
Fit-up
- Arrange parts in the final position using clamps or magnets.
- For precise angles, use a carpenter’s square.
- Leave a small gap (1–2mm) for full penetration on thick pieces.
Test-fit the assembly before welding. Poor fit-up leads to weak or ugly welds.
Tack Welds
- Apply small tack welds at the corners or every few inches.
- Tack welds keep pieces from moving while you weld the full seam.
Tack welds are easy to grind off and adjust if needed.
Preheating
- Some metals (like thick steel or cast iron) weld better if preheated with a torch.
- Preheating reduces cracking but is not always needed for mild steel.
For cast iron, preheat slowly to about 260°C (500°F) and let it cool slowly—rapid changes can crack the metal.
Step-by-step Guide: How To Weld For Beginners
Let’s walk through a basic welding process, focusing on MIG welding, as it’s easiest for most people. The steps are similar for other methods.
1. Set Up Your Equipment
- Plug in your welder and connect the ground clamp to clean metal.
- Install the correct wire (usually .030 or .035 inch for beginners).
- Attach the gas cylinder and set the regulator (usually 15–20 CFH for MIG).
- Select the correct voltage and wire speed (see the welder’s chart).
If your machine has a settings chart, use it as a starting point and adjust as needed. For thicker metal, use higher voltage and lower wire speed.
2. Put On Protective Gear
- Wear your welding helmet, gloves, and protective clothing.
- Ensure no skin is exposed.
Double-check that your helmet’s lens is clean and free from scratches.
3. Position The Workpiece
- Clamp your metal pieces securely on the table.
- Make sure edges are clean and lined up.
A solid setup means you can focus on welding, not holding the pieces together.
4. Strike The Arc
- Hold the MIG gun at a 10–15 degree angle toward the weld direction.
- Position the tip about 1/4 inch (6mm) from the metal.
- Pull the trigger to start the arc and move smoothly along the joint.
If you’re nervous, practice starting and stopping on scrap metal until you feel comfortable.
5. Make The Weld
- Move at a steady pace—too fast and the weld is weak, too slow and it piles up.
- Watch the weld pool (the molten puddle). Keep it even and centered.
- For thin metal, use short bursts (stitch welding) to avoid burn-through.
If the weld starts “spitting,” your stick-out might be too long or the settings need adjusting.
6. Finish And Clean
- Release the trigger at the end of the seam.
- Let the weld cool for a few seconds.
- Use a wire brush to clean off slag or spatter.
For MIG, there is usually little slag, but always inspect for leftover debris.
7. Inspect Your Weld
- Look for an even, smooth bead with no holes or gaps.
- For critical parts, tap with a hammer to check for cracks.
Check both sides of the joint. If you see holes or weak spots, grind them out and re-weld.
Step-by-step Example: Welding A Simple Steel Joint
Here’s a practical example—welding a 90-degree T-joint from two pieces of 1/8” (3mm) steel bar.
- Clean both bars with an angle grinder.
- Clamp one bar flat on the table. Place the other at 90 degrees.
- Tack weld both sides of the joint.
- Weld one side, moving from tack to tack.
- Let cool, then weld the other side.
- Clean and inspect.
Repeat the process with different joint types and positions to build your confidence.
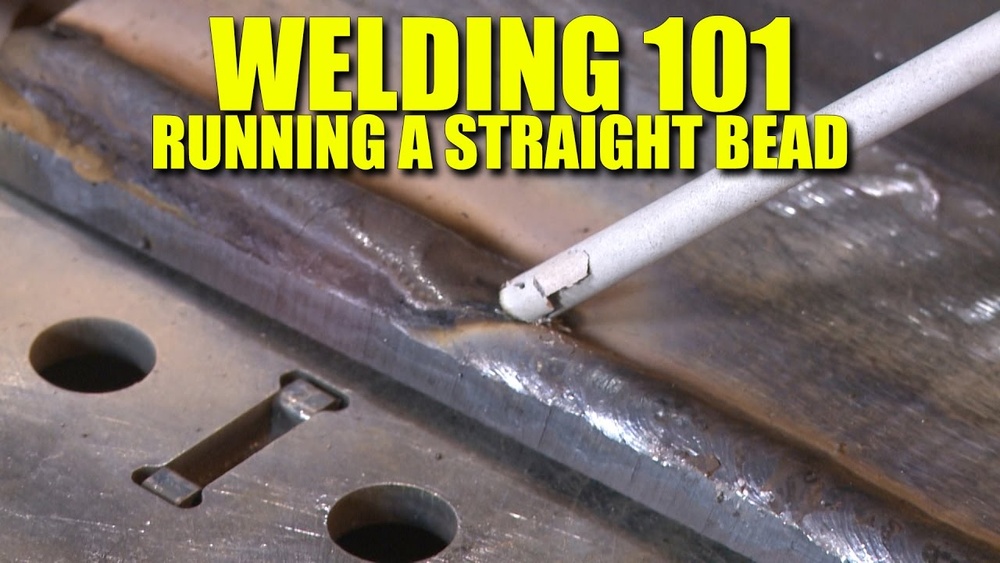
Welding Techniques: How To Make Different Types Of Welds
There are several types of welds you’ll use in projects. Here are the most common, with tips:
Butt Joint
- Two pieces side by side, joined along the edge.
- Good for sheet metal.
- Use a small gap for best penetration.
For thicker pieces, bevel the edges for deeper welds.
T-joint
- One piece joins the middle of another at 90 degrees.
- Common for frames and tables.
- Weld both sides for strength.
Keep the vertical piece slightly off the base for a cleaner weld pool.
Lap Joint
- One piece overlaps the other.
- Easy for beginners.
- Place weld along the edge of the overlap.
Lap joints are strong and forgiving, making them good for practice.
Corner Joint
- Two pieces meet at the edge to form a corner.
- Use clamps to keep the angle steady.
If welding a box, alternate corners to avoid pulling the pieces out of square.
Fillet Weld
- The most common type—fills the corner where two pieces meet.
- Keep the weld bead triangular for strength.
Don’t make the weld wider than the base metal; too much filler can weaken the joint.
Plug And Spot Welds
- Used for thin metal, like car panels.
- Make holes in one piece and fill with weld.
Spot welds are strong but require special equipment for best results.
Multi-pass Weld
- For thick metal, use several layers of weld.
- Chip off slag between passes.
Multi-pass welds build up thickness and strength, especially on heavy equipment.
Welding Positions
Welds can be made in different positions. Each affects difficulty and technique.
Flat Position
- Easiest for beginners.
- Workpiece lies flat, weld from above.
Gravity helps keep the weld pool in place.
Horizontal Position
- Weld is on a vertical surface, but you weld sideways.
- Keep the pool from sagging.
Tilt the gun slightly upward to control the weld pool.
Vertical Position
- Weld up or down a vertical seam.
- Use lower heat to prevent runs.
Weld upward for stronger joints. Welding downward is faster but weaker.
Overhead Position
- Hardest for beginners.
- Keep weld small and move quickly.
Practice on scrap before trying overhead welds on important projects.
Table: Welding Positions And Difficulty
| Position | Description | Difficulty | Common Use |
|---|---|---|---|
| Flat | Weld from above | Easy | Most beginner projects |
| Horizontal | Weld sideways | Medium | Frames, rails |
| Vertical | Weld up or down | Hard | Pipes, tanks |
| Overhead | Weld from below | Very Hard | Ceiling repairs |
When practicing, start with flat welds before moving to other positions.
Credit: yeswelder.com
Common Welding Mistakes And How To Fix Them
Even experienced welders make mistakes. Here are the most common, and how to avoid them:
Porosity (holes In The Weld)
- Cause: Dirty metal, wind blowing away shielding gas, or too much moisture.
- Fix: Clean your metal, check gas flow, and keep drafts away.
Moisture in the welding wire or electrode can also cause porosity. Store consumables in a dry place.
Undercut (groove In Base Metal)
- Cause: Moving too fast, too much heat.
- Fix: Slow your travel speed and reduce power.
Undercut weakens the joint and can cause cracks. Fill the groove with another pass if needed.
Lack Of Penetration
- Cause: Not enough heat, moving too fast.
- Fix: Increase amperage and slow down.
A shallow weld bead that sits on the surface is likely too cold.
Burn-through
- Cause: Too much heat on thin metal.
- Fix: Lower power, use shorter welds.
If you burn through, let the metal cool, then fill the hole with short bursts.
Spatter
- Cause: Incorrect settings, dirty metal.
- Fix: Adjust voltage/wire speed and clean metal.
Anti-spatter spray helps, but good settings are the best fix.
Cracking
- Cause: Cooling too fast, poor fit-up.
- Fix: Preheat thick pieces, ensure tight fit.
Cracks often start at the end of welds. Try welding a little past the joint, then moving back for a strong finish.
A non-obvious insight: The “stick-out” (the length the wire extends from the gun tip) is often forgotten. Too long creates spatter and weak welds; too short can cause the tip to overheat.
Tips For Improving Your Welding Skills
To get better at welding, practice is essential. But you can learn faster with these tips:
- Start Small: Practice on scrap metal before real projects.
- Watch the Pool: Focus on the molten puddle, not just the arc.
- Use Both Hands: Steady your welding hand with your other hand for more control.
- Check Settings: Every project may need different power or speed.
- Keep Clean: Clean your metal and your gun nozzle often.
- Learn to Listen: A good MIG weld “sizzles” like bacon. Too much popping means a problem.
- Change Angles: Try different gun angles for better results.
- Don’t Rush: Move steadily but not too fast.
- Try Different Joints: Practice T-joints, lap joints, and butt joints.
- Ask for Feedback: Show your welds to experienced welders.
Non-obvious Insights
- Wire Stick-Out Matters: For MIG, keeping a consistent wire stick-out (about 1/4 inch) gives you a stable arc and better results.
- Gas Flow Rate: Too much shielding gas can create turbulence, pulling in air. Stick to the recommended flow rate.
Another overlooked tip: Clean your welding nozzle often. Spatter buildup can block gas flow and ruin welds.
Troubleshooting: When Your Welds Go Wrong
Welding problems can be frustrating, but most have simple fixes.
No Arc
- Check your ground clamp and power.
- Make sure wire or electrode is feeding.
Sometimes the contact tip is clogged—replace it if needed.
Wire Won’t Feed
- Check for kinks in the wire or liner.
- Adjust the tension on the feeder.
A worn-out liner can stop wire feeding. Replace it if wire still jams.
Poor Penetration
- Increase heat or slow down.
- Clean metal better.
Check that you’re using the right wire for the metal type.
Excessive Spatter
- Lower voltage or increase wire speed slightly.
- Clean nozzle and contact tip.
Try anti-spatter spray for easier cleanup.
Inconsistent Bead
- Keep your hand steady and move at a constant speed.
- Practice “weaving” for wider welds.
If your hand shakes, rest your arm or wrist on the table for support.
Welding On Different Metals
Each metal type needs special care.
Welding Mild Steel
- Most forgiving for beginners.
- Use ER70S-6 wire for MIG.
Mild steel welds easily with basic settings. Use CO₂ or argon/CO₂ mix for shielding.
Welding Stainless Steel
- Needs a tri-mix gas (argon, CO₂, helium) for best results.
- Clean with a dedicated brush to avoid contamination.
Stainless steel is sensitive to heat. Too much can cause discoloration or weaken the weld.
Welding Aluminum
- Use 100% argon gas.
- A spool gun is helpful for MIG.
- Aluminum melts at a lower temperature—move fast.
Aluminum forms an oxide layer quickly; brush and weld immediately.
Welding Cast Iron
- Preheat slowly and cool slowly to avoid cracks.
- Use special electrodes (nickel-based).
Cast iron cracks easily if heated or cooled too fast. Weld short sections and peen with a hammer to relieve stress.
Table: Basic Weld Settings For Common Metals
| Metal | MIG Wire Type | Shielding Gas | Tip |
|---|---|---|---|
| Mild Steel | ER70S-6 | 75% Argon/25% CO₂ | Clean, easy weld |
| Stainless Steel | ER308L | Tri-mix | Dedicated brush |
| Aluminum | ER4043 | Argon | Spool gun helps |
A mistake beginners make is using the wrong wire or gas—always check before starting.
Choosing The Right Welding Process For Your Project
Each project needs the right method. Here’s how to decide:
- MIG: General repairs, auto work, hobby projects.
- Stick: Outdoor repairs, farm equipment, thick materials.
- TIG: Fine, clean welds—bikes, art, thin aluminum.
- Flux-Cored: Outdoor work, heavy construction.
Factors To Consider
- Material Thickness: Thicker metal may need stick or multi-pass MIG.
- Location: Windy outdoor work favors stick or flux-cored.
- Budget: MIG machines cost more but are easier to use.
- Skill Level: MIG is most beginner-friendly.
Before buying a welder, consider what types of projects you want to do now and in the future.
How To Practice Welding Safely And Effectively
Good welding comes with practice, but practice smart:
- Use Scrap Metal: Start with pieces similar to your project.
- Repeat the Same Joint: Practice butt, lap, and T-joints.
- Change Parameters: Try different heat and speed settings.
- Keep a Log: Write down what works and what doesn’t.
- Film Yourself: Watching your hand position helps improve.
- Inspect Welds: Cut through practice welds to see inside.
Common Beginner Mistake
Many new welders skip practice, rushing to “real” projects. This leads to frustration and poor results.
Take time to experiment with settings, angles, and speeds. You’ll get better results and avoid costly mistakes.
Understanding Weld Quality: What Makes A Good Weld?
A strong weld isn’t just about looks. Here’s what to check:
Appearance
- Smooth, even bead.
- No holes, cracks, or excessive spatter.
- Good tie-in to both pieces.
A good weld bead should look like stacked coins and be uniform along its length.
Strength
- Weld should not break before the metal does.
- Test by hammering or bending a test piece.
For critical parts, bend the welded piece to check for cracks or separation.
Penetration
- The weld should melt both pieces, not just sit on top.
- Cross-section should show full fusion.
Cut a test weld in half and polish the edge to check for penetration.
Defects To Avoid
- Porosity: Tiny holes weaken the weld.
- Cracking: Caused by stress, poor technique, or cooling too fast.
- Incomplete Fusion: Sides of the joint not fully melted.
A non-obvious test: Tap the weld with a hammer—if it rings, it’s likely solid; if it thuds, it may be weak inside.
Advanced Welding Techniques
As you gain skill, try these advanced methods:
Weaving
- Move the gun side-to-side to fill wider joints.
- Use a steady, even motion.
Weaving helps cover larger areas without overheating.
Pulse Welding
- Some machines have a “pulse” setting—good for thin metal.
Pulse welding controls heat and is used for thin or delicate materials.
Back-stepping
- Weld short sections in reverse order to reduce distortion.
Back-stepping prevents metal from warping on long seams.
Stacking Dimes
- For TIG, make small circles to create a “stack of dimes” look.
This technique is the hallmark of professional TIG welds.
Out-of-position Welding
- Practice vertical and overhead welds for more flexibility.
Each position requires adjusting your speed and angles for best results.
Welding For Repairs Vs. Fabrication
Welding can fix broken parts or build new ones.
Repairs
- Remove damaged metal first.
- Weld in small sections to avoid warping.
- Use clamps to hold pieces in place.
For repairs, always grind out cracks and clean the area before welding.
Fabrication
- Measure and cut all pieces before welding.
- Tack weld everything, check alignment, then finish welds.
- Let parts cool before handling.
Measure twice, cut once. Precision in setup leads to easier welding and stronger projects.
Welding Art And Creative Projects
Welding isn’t just for repairs or construction. Many artists use welding to make sculptures, garden art, and furniture.
- Use scrap metal for unique designs.
- Try different finishes—paint, polish, or rust.
- Practice joining thin metal for delicate work.
Small projects like candle holders or wall art are great for learning new techniques without much material cost.

Credit: weldingmart.com
Welding Certification And Careers
If you enjoy welding, you can turn it into a career.
Certification
- Many jobs require certification (AWS, ASME).
- Courses teach advanced skills and safety.
Community colleges, trade schools, and unions offer training. Certification shows employers you meet industry standards.
Career Options
- Construction, shipbuilding, automotive, pipelines, and art.
- Some welders earn over $50,000 a year.
Welding careers can take you around the world, including offshore oil rigs or underwater welding jobs.
External Resource
For more information on careers, visit the Wikipedia page on welders.
Maintenance And Care Of Welding Equipment
Keep your tools in good shape for safety and quality.
Welding Machine
- Check cables and connections before each use.
- Clean dust and metal filings from vents.
Blow out the machine with compressed air every few months to prevent overheating.
Helmet And Gear
- Replace damaged helmets or cracked lenses.
- Wash gloves and clothing regularly.
Inspect your helmet’s headband for cracks or loose fittings.
Gas Cylinders
- Store upright, secured to a wall or cart.
- Check for leaks before use.
Never transport cylinders in a closed car trunk—gas leaks are dangerous.
Wire And Electrodes
- Store in a dry place to prevent rust.
- Replace if corroded.
Keep wire spools in sealed bags with silica gel packs to absorb moisture.
Environmental Impact Of Welding
Welding has some environmental risks.
- Fumes can harm air quality—always ventilate.
- Metal dust and spatter should be cleaned up.
- Dispose of old electrodes and wires safely.
Collect scrap metal and recycle it when possible. Never wash metal filings down a drain.
Energy Use
- Some welding machines use a lot of electricity.
- Turn off equipment when not in use.
Use energy-efficient LED lighting and unplug machines when finished.
Welding Myths And Facts
There are many myths about welding. Let’s clear up a few:
- Myth: Only men can weld.
Fact: Many skilled welders are women.
- Myth: You can weld anything with any machine.
Fact: Each metal and thickness needs the right process.
- Myth: Welders always work in dirty factories.
Fact: Welding is used in art, labs, and high-tech industries.
- Myth: It’s easy to weld well after a few tries.
Fact: Good welds take practice and skill.
Another myth: “Welding always looks ugly.” With practice, your welds can be clean and beautiful—even decorative.

Credit: www.youtube.com
Frequently Asked Questions
What Is The Easiest Welding Process For Beginners?
For most beginners, MIG welding is the easiest to start with. The equipment is simple, the process is forgiving, and you get quick results. It’s great for small repairs, hobby projects, and learning the basics.
Do I Need Special Ventilation When Welding?
Yes, proper ventilation is critical. Welding creates fumes that can be harmful, especially when working with metals like galvanized steel. Always weld in a well-ventilated area or use exhaust fans. For some metals, a respirator is needed.
Can I Weld Without A Helmet?
No, you should never weld without a proper welding helmet. The bright arc can cause “arc eye,” a painful injury, and permanent vision loss. Always protect your face and eyes.
How Do I Know If My Weld Is Strong Enough?
A good weld should have full penetration, a smooth appearance, and no cracks or holes. For important parts, test the weld by bending or striking the piece. If the weld holds and the metal bends first, it’s strong.
Is Welding Dangerous For Beginners?
Welding is safe if you follow basic precautions: wear protective gear, work in a clean area, and respect the equipment. The main risks are burns, eye injuries, and fumes. Many beginners get hurt by skipping safety steps, so always take time to prepare.
Welding is a skill that can open doors to repair, creativity, and even a new career. Start with the basics, practice safely, and keep learning as you go. Over time, your welds will get stronger, cleaner, and more professional. Whether you’re fixing a broken gate or building a metal sculpture, the possibilities with welding are almost endless.
Note: ElectroWeld is reader-supported. If you click a link and buy something we may receive a small commission at no extra cost to you., learn more on disclaimer.
Walton M. Edwards was born in 1994 in a coal mining town, he has worked as a welder, a hardware salesman, and as a pipe fitter and has been employed as a laborer for about fifty years. Walton is a native of Wabash County in Indiana, but he now resides in Bloomington, Indiana.